
When people talk about a 'standard graduation cap size,' they aren't referring to that iconic square top.They're talking about the part that actually fits on your head. Think of it like a fitted baseball cap—the size is all about making sure it sits comfortably and securely through the entire ceremony. The square part, which is called the mortarboard, is almost always a standard 9.4 inches on all sides.
Demystifying Your Graduation Cap Size

Sorting through graduation regalia can feel like a lot, but figuring out your cap size is actually pretty simple. The goal is to get a fit that’s snug enough to stay put but not so tight that it's uncomfortable. The last thing you want is to be fussing with a wobbly cap when you should be celebrating your achievement.
Most suppliers, including us here at Gradshop, offer sizes from Small to Extra Large that line up with your head measurement. It's a common myth that caps are "one size fits all." While some do have a bit of elastic for flexibility, taking a quick, accurate measurement is the real secret to all-day comfort and looking great in your photos.
The Mortarboard: A Universal Standard
For decades, the flat, square top of the graduation cap has stayed remarkably consistent. This mortarboard almost always measures around 9.4 inches (24 cm) per side, a dimension that’s become a globally recognized symbol of academic achievement. This standardization is what creates that classic, scholarly silhouette, whether you're graduating from kindergarten or earning your doctorate. If you're curious about the history, you can find more insights on graduation cap measurements on our blog.
Because the mortarboard is always the same, you only have one job: measure your head. It really simplifies the whole process.
Key Takeaway: Don't worry about the size of the square top. Just focus on measuring the circumference of your head to find your real cap size, exactly like you would for any other hat.
Why the Right Fit Matters
Getting the size right helps you avoid those little annoyances that can take away from your big day. A cap that's too tight will give you a headache. One that's too loose might slip off at the worst possible moment—like right as you’re shaking the dean's hand.
A proper fit guarantees:
- Comfort: You can wear it for hours without even thinking about it.
- Security: Your cap will stay put through all the walking, photos, and even the celebratory cap toss.
- Appearance: It sits level and looks sharp, helping you look and feel your best.
By taking just a minute to measure, you take all the guesswork out of it and can feel totally confident from the moment you walk in to the final celebration.
How to Measure Your Head for a Perfect Fit
Getting your graduation cap to fit just right is the first step to a comfortable, worry-free ceremony. Think about it—you'll be wearing it for hours, and the last thing you want is a cap that's too tight and causing a headache, or so loose it feels like it'll fly off with every step.
Thankfully, finding your perfect fit is incredibly simple. All it takes is two minutes and a flexible measuring tape to get the one number you need.
Your Step-by-Step Measuring Guide
Follow these quick steps to find your head circumference. This is the magic number that unlocks your standard graduation cap size on any chart.
-
Find the Sweet Spot: Grab a soft measuring tape and position it about one inch (or 2.5 cm) above your eyebrows and ears. You want to measure around the widest part of your head to get the most accurate reading.
-
Wrap and Check: Gently wrap the tape around your head, making sure it stays level and parallel to the floor. Don’t pull it super tight! The tape should be snug, but comfortable—just like how you'd want your cap to feel.
-
Read Your Size: Note the number where the measuring tape overlaps. That’s it! That’s your head circumference. It's smart to jot down the measurement in both inches and centimeters, since different brands might use one or the other.
Pro Tip: It never hurts to measure two or even three times, just to be sure. If you get slightly different results, always go with the larger measurement. A cap that’s a tiny bit loose is far better than one that’s painfully tight.
What If You Don't Have a Measuring Tape?
No measuring tape handy? No problem. You can still get a precise measurement with a few common items you probably have lying around.
- Grab Some String: Find a non-stretchy piece of string, yarn, or even a phone charging cable. Wrap it around your head exactly as you would a measuring tape—about an inch above your eyebrows.
- Mark the Point: Once the string is wrapped snugly, pinch or mark the spot where the end meets the rest of the string.
- Measure It Flat: Now, just lay the string flat against a regular ruler or yardstick and measure from the end to the mark you made. Voilà! You have your head circumference.
Nailing this measurement is the key to a stress-free graduation day. For a complete guide to fitting your entire outfit, from head to toe, be sure to check out our detailed instructions on how to measure for a cap and gown. It'll make sure every part of your regalia looks and feels perfect.
Using a Graduation Cap Size Chart
Alright, you've got your head measurement. Now what? It's time to turn that number into your actual cap size, and that’s where a good size chart comes in. Think of it as a simple translator, converting the number you just jotted down into a perfect fit.
This whole process is about taking the guesswork out of ordering. Whether you're trying to figure out your cap size or learning about navigating a size chart for various items, the goal is the same: confidence in your choice. The chart will match your head circumference—in either inches or centimeters—to a standard size, usually something like Small (S), Medium (M), Large (L), or Extra Large (XL).
This handy visual breaks it all down, from how to wrap the tape measure to finding your final size.
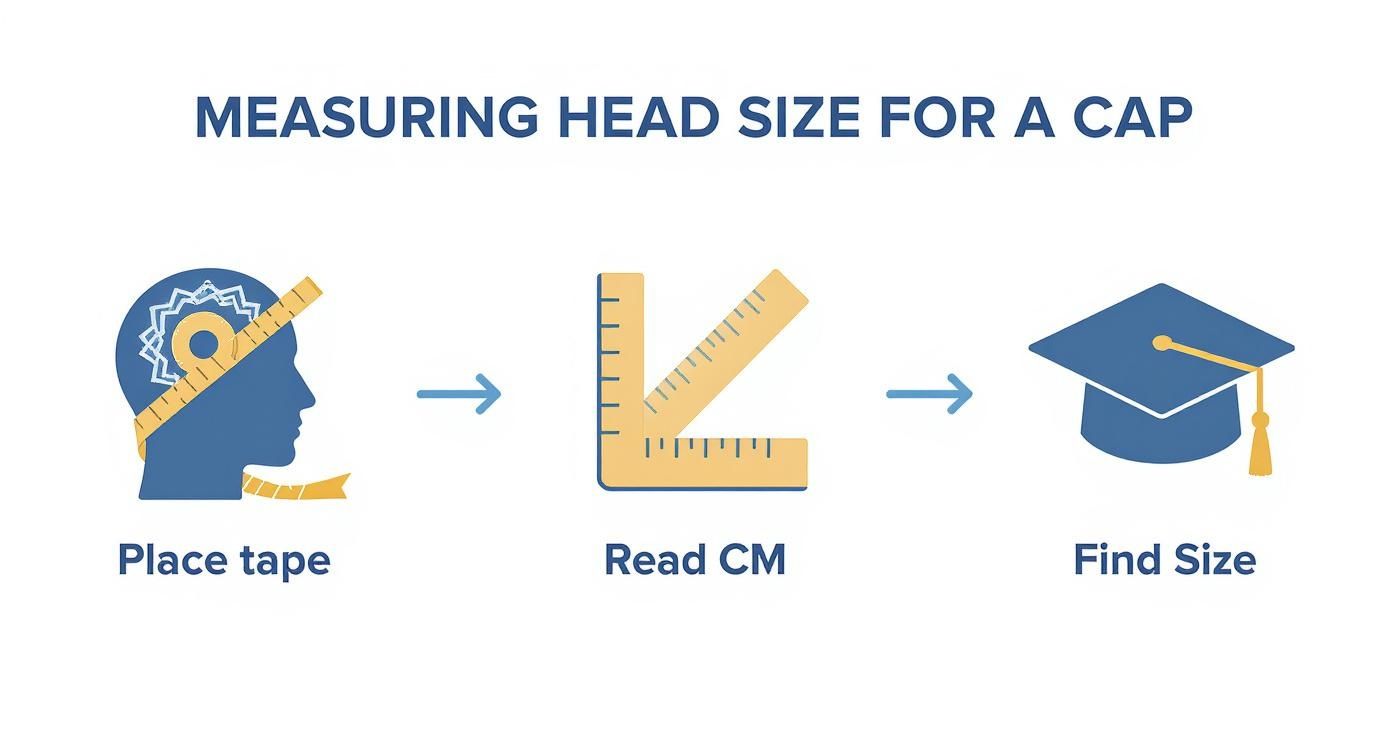
As you can see, it really boils down to three simple steps: placing the tape, getting the number, and then matching it on the chart. Easy as that.
Decoding the Numbers
Now, let's look at how to read a typical graduation cap size chart. It's essentially a straightforward grid that links your head circumference to the size you should order.
Standard Graduation Cap Size Conversion Chart
Our chart below makes it easy to find your recommended size. Just locate your measurement in either inches or centimeters and look across to find the corresponding cap size.
| Head Circumference (Inches) | Head Circumference (CM) | Recommended Cap Size |
|---|---|---|
| 21 1/4" – 21 7/8" | 54 cm – 55 cm | Medium (M) |
| 22" – 22 3/4" | 56 cm – 57 cm | Large (L) |
| 22 7/8" – 23 1/2" | 58 cm – 59 cm | Extra Large (XL) |
| 23 5/8" – 24 1/4" | 60 cm – 61 cm | Extra Extra Large (XXL) |
You’ll notice that each size covers a small range of measurements. To see how your cap size coordinates with your gown, be sure to check out our complete graduation cap and gown size chart guide.
Crucial Tip: If you find yourself caught between two sizes, always choose the larger one. A slightly loose cap can easily be secured with a couple of bobby pins, but a cap that's too tight will just give you a headache during the ceremony. Trust us on this one.
Based on what we see from academic suppliers, the most common sizes ordered are Medium (54–55 cm), Large (56–57 cm), and Extra Large (58–59 cm). Generally speaking, a size L is a very popular choice for bachelor's graduates, while XL is often a better fit for those receiving their master's degrees, likely due to simple demographic shifts.
Understanding Sizing for Doctoral Tams
When you reach the doctoral level, your academic regalia gets a serious upgrade. The familiar flat mortarboard is often replaced by a soft, plush tam, a special piece of headwear that immediately signals the highest level of academic achievement.
The good news is that the process for finding your size is exactly the same as for a standard graduation cap—you'll still need to measure your head’s circumference. What's different, though, is how a tam fits and feels.
From Rigid Mortarboard to Comfortable Tam
Unlike the stiff, one-size-fits-all feel of a mortarboard, a doctoral tam is made from soft, luxurious velvet. This isn't just for looks; the material gives it a much more comfortable and forgiving fit. Tams are designed to be flexible, many with an elastic band inside, which means they can easily accommodate slight variations in head size. That flexibility is a welcome feature during a long commencement ceremony.
What's with the Different Shapes?
You'll also notice that doctoral tams come in different shapes, and that’s not just for style. The number of sides often reflects a specific academic tradition or your university's particular customs.
- Four-Sided Tams: These are less common but are still used by some universities. Think of them as a softer, more relaxed version of the classic mortarboard.
- Six-Sided Tams: This is a very popular choice. It provides a classic, well-balanced look that's instantly recognizable in academic circles.
- Eight-Sided Tams: The eight-sided design creates a fuller, more rounded silhouette and is another common and distinguished option for doctoral graduates.
Which one is right for you? That's usually decided by your university's regalia guidelines. To get a better handle on the symbolism and history, you can learn more about the tam graduation cap and its rich traditions. Knowing the background helps ensure you're ordering the correct headwear for your big day.
Key Difference: The biggest distinction is flexibility. A doctoral tam's soft velvet and pliable design make it naturally more comfortable than a rigid mortarboard. It adapts to the shape of your head instead of forcing your head to adapt to it.
Choosing the right tam is one of the final, important steps in preparing for your doctoral commencement. Just use the same head measurement you would for any standard graduation cap size, and you can confidently pick the right tam. This way, you can be sure your regalia is not only correct but also comfortable, letting you focus completely on your incredible achievement.
How to Wear Your Graduation Cap Correctly

Getting the right standard graduation cap size is the first step, but wearing it correctly is what pulls your entire academic look together. The proper placement makes you look polished and ready for every photo op and your big moment on stage, letting your confidence shine through.
Think of the mortarboard—the flat, square top—as a tabletop. It should sit level on your head, parallel to the floor. It's tempting to tilt it back like a beanie, but keeping it flat is the key to that classic, dignified graduate look.
Your cap also has a clear front and back. The front is the side that comes to a point. Make sure that point is centered squarely on your forehead. This simple alignment makes the cap look balanced and intentional from all angles.
Mastering the Tassel Tradition
That tassel hanging from your cap is more than just a decoration; it’s a powerful symbol marking the end of your academic journey. Where you place it follows a tradition that signals your shift from candidate to graduate.
Before the ceremony kicks off and your name is called, your tassel should hang on the right side of your cap. This shows everyone you're still a candidate for graduation.
Then comes the big moment: "the turning of the tassel." After your degree is officially conferred, you’ll move the tassel from the right side over to the left side. It's a small movement, but it’s a powerful gesture that announces you've officially earned your degree.
Ceremony Tip: Don't jump the gun! Listen for cues from the commencement speaker or your dean. Most schools coordinate this moment, so all the graduates turn their tassels at the same time, making it a really memorable and unified experience.
Tips for a Secure and Stylish Fit
Keeping your cap in place, especially if you have very fine or lots of hair, can feel like a challenge. But with a little prep work, you can stop it from slipping and sliding, so you can just focus on your achievement.
- Bobby Pins Are Your Best Friend: Don't be shy with them! Use several bobby pins to lock the cap to your hair. The trick is to slide them through the cap's inner headband and into your hair for a hold that's strong but invisible.
- Create a Secure Base: If your hair is extra smooth, try making a small, tight ponytail or a few braids right where the cap will sit. This gives the bobby pins something solid to grab onto.
- Criss-Cross for Extra Hold: For a truly locked-in feel, use two bobby pins to make an "X" on each side of the cap. This criss-cross technique provides a much stronger anchor than a single pin ever could.
Got Questions About Graduation Cap Sizes? We've Got Answers
Even with a measuring tape and size chart in hand, you might still have a few questions. We get it. To make sure you feel completely confident placing your order, we’ve rounded up the most common things people ask about getting the right standard graduation cap size.
Think of this as your quick-start guide to a perfect fit.
Are Graduation Caps One Size Fits All?
This is a really common myth, but the short answer is no. While some caps have a little elastic in the band for some wiggle room, they aren't truly one-size-fits-all. Most are sized specifically by head circumference to make sure they're secure and comfortable for everyone. Going for a generic "one size" option is often a recipe for a cap that’s either painfully tight or constantly slipping off.
What if I Am Between Two Sizes?
If your measurement lands you right between two sizes on the chart, here’s the golden rule: always choose the larger size. It's a simple trick that prevents a lot of headaches—literally.
A cap that's slightly too big is a quick fix and far more comfortable during a long ceremony. You can easily use a couple of bobby pins to snug it up, but there's no way to make a cap that's too small work.
How Do I Keep My Cap from Falling Off?
It all starts with getting the right size, but a few simple tricks can give you that extra security. The go-to method is using bobby pins to anchor the cap to your hair.
For a hold that won't budge, slide two pins in a crisscross “X” pattern on each side. Make sure you’re pinning the inner band of the cap directly to your hair. This little technique will keep your cap perfectly in place from the first photo op to the final tassel turn.
And once you've nailed down the perfect cap fit, you might start thinking about other graduation details, like presents. If you need some inspiration, check out these thoughtful graduation gift recommendations to find a memorable way to celebrate the big achievement.
At Gradshop, we have everything you need to look the part for your commencement, from classic high school caps and gowns to the distinguished tams worn for doctoral degrees. Take a look through our collections and find the perfect regalia for your big day.