
Designing the perfect custom diploma cover is about so much more than just picking a color. It’s about choosing the right materials, getting the personalization just right, and creating something that truly honors the achievement inside. When done well, you transform a simple certificate into a keepsake that graduates will hold onto for a lifetime. The process all starts with a few foundational choices that define the cover's look, feel, and durability.
Your Blueprint for the Perfect Diploma Cover
Think of a diploma cover not just as a folder, but as the final, finishing touch on years of dedication and hard work. It's the first thing people see. It protects a priceless document, sure, but it also stands as a symbol of school pride and a very personal accomplishment.
Whether you're a school administrator coordinating an order for hundreds of graduates or a proud family member looking for a special way to honor a loved one, knowing the ins and outs of the design process is key.
This guide will walk you through everything, step-by-step, showing you exactly how to design a custom diploma cover that not only meets your needs but genuinely wows. We’ll break down every decision point, from picking the right material to signing off on the final proof.
Mapping Out Your Design Journey
The path to a memorable cover begins with a solid plan. Each choice you make—from the texture of the cover to the finish of the text—builds on the last, shaping the final product's quality, appearance, and even its cost.
Here are the key stages to think through:
- Material and Construction: This is your starting point. You'll need to decide between classic paper, durable vinyl, or a more premium padded leatherette. This choice really sets the tone for both aesthetics and how well it will hold up over time.
- Size and Orientation: Getting the fit right is non-negotiable. Most diplomas are standard sizes like 8.5" x 11" or 6" x 8", so you need to ensure the cover is a perfect match.
- Color Selection: This is where you bring in your school spirit. Choosing colors that align with your institution’s brand keeps everything looking cohesive and professional, from the caps and gowns to the graduation stoles.
- Artwork and Personalization: The final flourish! Adding a school crest, logo, or custom text using techniques like foil stamping or embossing gives the cover that distinguished, official look.
For example, I've seen many high schools go with a sturdy, cost-effective vinyl cover in their school colors, finished with a simple, elegant foil-stamped crest. On the other hand, a university conferring doctoral degrees might invest in a premium padded leatherette cover with intricate, multi-level embossing to reflect the prestige of the achievement. It's all about matching the cover to the occasion.
A well-designed diploma cover isn't just a holder; it's a tangible reminder of a huge milestone. It preserves the memory of the ceremony and showcases a graduate’s hard work for decades. Investing in a quality design ensures this keepsake remains a point of pride on any bookshelf or mantelpiece.
Thinking through these elements upfront will help you navigate the essential choices and ensure a smooth process from concept to delivery. By considering the big picture first, you can create a beautiful and durable final product that graduates—whether from high school or a Master's program—will truly treasure.
To get a better sense of what's possible, take a look at our wide selection of customizable diploma covers. You can see these different options in action and start imagining the perfect match for your institution.
For a quick reference, this checklist breaks down the key decisions you'll make at each stage of the design process.
Diploma Cover Design Decision Checklist
| Design Stage | Key Decisions | Best For |
|---|---|---|
| Foundation | Material (Leatherette, Vinyl, Paper), Padding, Size (e.g., 8.5" x 11") | Aligning the cover's feel and durability with the academic level and budget. |
| Branding | Cover Color, Interior Lining (Silk, Acetate), Corner Ribbons | Schools wanting a cohesive look that matches their official colors and other regalia. |
| Personalization | Foil Stamping vs. Embossing, School Crest/Logo Placement, Text (Year, Degree) | Creating a unique and distinguished design that reflects institutional pride. |
| Finalization | Template Submission, Proof Review, Quantity & Timeline Confirmation | Ensuring accuracy for bulk orders and preventing errors before production begins. |
This table serves as a great high-level guide to keep on hand as you move from initial idea to final product, ensuring no detail is overlooked.
Selecting the Right Materials and Construction
The material you choose for a diploma cover is more than just a detail—it's the foundation of the entire piece. It sets the tone, defines the look and feel, and ultimately determines how well that cover will protect a graduate's hard-earned credential for decades to come. This decision directly shapes the perceived value of the memento, making it one of the most critical calls you'll make in the design process.
From classic, budget-friendly paper options perfect for large-scale ceremonies to distinguished leatherette for prestigious doctoral degrees, each material brings its own unique blend of texture, resilience, and cost. Getting to know these differences is the key to choosing something that truly reflects your institution's standards and what your graduates will cherish.
Understanding Your Material Options
The world of diploma holders has really grown, with solutions now available for every scenario and budget. Picture this: a community college preparing for a class of 1,500 graduates will likely look for a sturdy yet cost-effective material like vinyl. On the other hand, a private university might opt for premium padded covers for its MBA program to mirror the program's prestige.
Today, there are essentially five main categories of materials, and each one fills a specific niche.
- Paper diploma covers are the most economical choice. They cost significantly less than the alternatives, which makes them a practical solution for huge graduation ceremonies where you're handing out hundreds or even thousands of diplomas at once.
- Vinyl diploma covers sit in that sweet spot of value and durability. They do a great job protecting documents from bends, spills, and general wear and tear while still being lightweight.
- Padded diploma covers feel a bit more premium. With interior padding or a soft velvet lining, they offer an extra layer of cushioning that gives them a substantial, high-quality feel.
- Leather diploma cases are at the top end. They command a higher price, but for good reason—their aesthetic appeal and professional look are unmatched. For many institutions, leather covers project a sense of prestige that’s important for the ceremony.
This flowchart can help simplify the decision-making process, walking you through the key choices from material to final proofing.
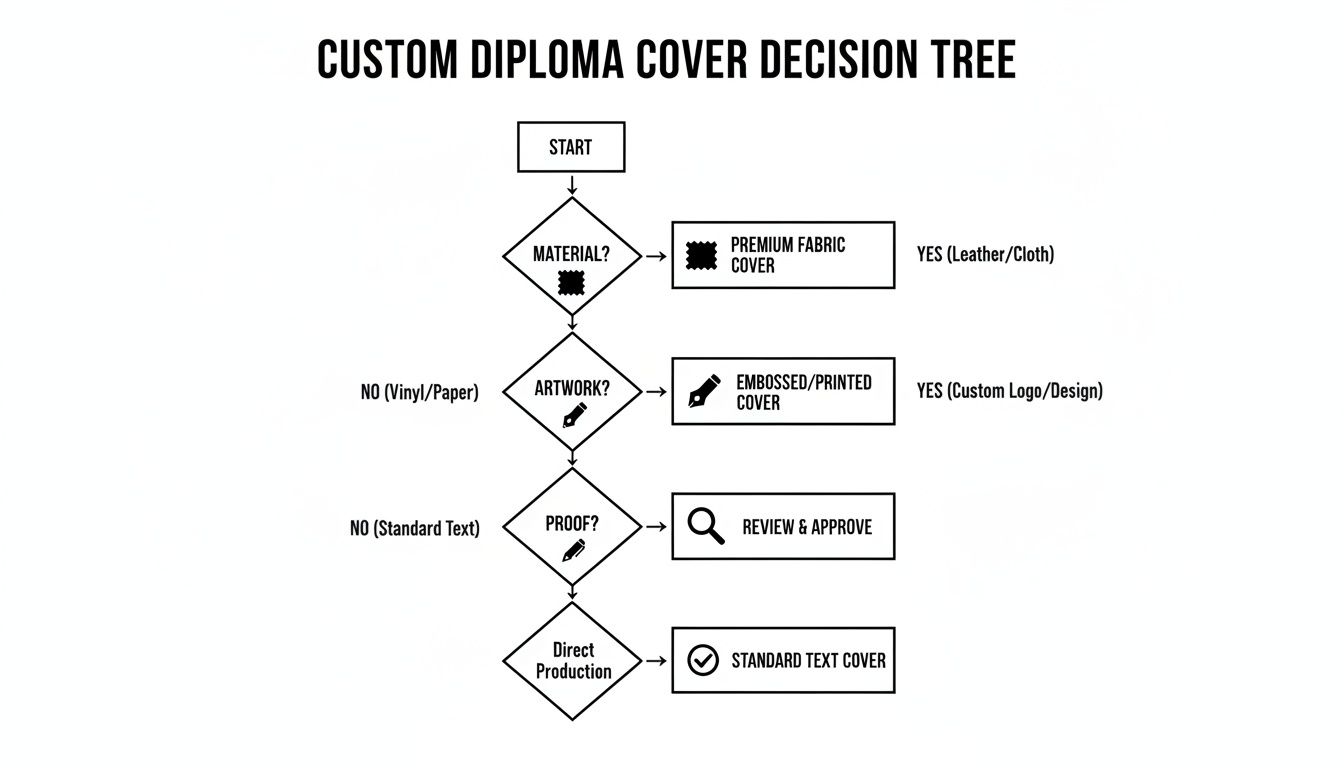
As you can see, that initial material choice really does set the stage for everything that follows.
A Closer Look at Popular Cover Materials
Let's dig into the most common options to help you find the right fit. Each material has its own distinct personality and purpose.
- Paper/Cardstock Covers: These are your go-to for budget-friendliness, especially when ordering in massive quantities. While they aren't built for long-term abuse, they provide a clean, dignified presentation for the big day.
- Vinyl Covers: A solid step up in resilience, vinyl offers great protection from moisture and bending. It’s a popular middle-ground choice that balances cost and longevity beautifully, making it a workhorse for high schools and undergraduate programs.
- Leatherette (Faux Leather) Covers: This is easily the most popular premium choice. Leatherette gives you that sophisticated look and feel of genuine leather without the hefty price tag. Its smooth, elegant texture is the perfect canvas for foil stamping or embossing.
- Padded Covers: For that extra touch of class, padded covers have a layer of foam beneath the main material. This doesn't just add protection; it gives the cover a weighty, substantial feel in hand that is often preferred for master's and doctoral degrees.
Pro Tip: Think about the entire graduation experience. A premium padded cover can elevate the moment a graduate receives their diploma, making their achievement feel even more significant.
When you're weighing your options, getting some background on selecting appropriate materials for both appearance and durability can be incredibly helpful.
Essential Construction Details Inside the Cover
What's on the inside counts just as much as the outside. The interior construction plays a huge part in both function and presentation, and these small details can make a world of difference.
Interior Lining and Corners
A quality diploma cover pays attention to the interior. Here's what to look for:
- Silk Moire Lining: This elegant, watered-silk fabric is often used to line the interior panels. It adds a touch of class and provides a soft surface that won't scuff or scratch the diploma.
- Ribbon Corners: Four (or sometimes eight) silk ribbon corners are the traditional way to hold the document securely in place. They make it easy to insert the diploma without accidentally bending or damaging the corners.
- Acetate Protector: This is a clear sheet placed over the diploma to shield it from dust, fingerprints, and smudges. This transparent layer keeps the document looking pristine.
For a particularly valuable credential, like a doctoral degree, pairing a well-made cover with a quality frame is the best way to preserve it. If that’s on your mind, you might find our guide on protecting those certificates: doctoral diploma frames useful.
Ultimately, combining the right exterior materials with sturdy interior construction ensures your custom diploma cover serves as a lasting tribute to academic success.
Mastering Artwork and Custom Finishes
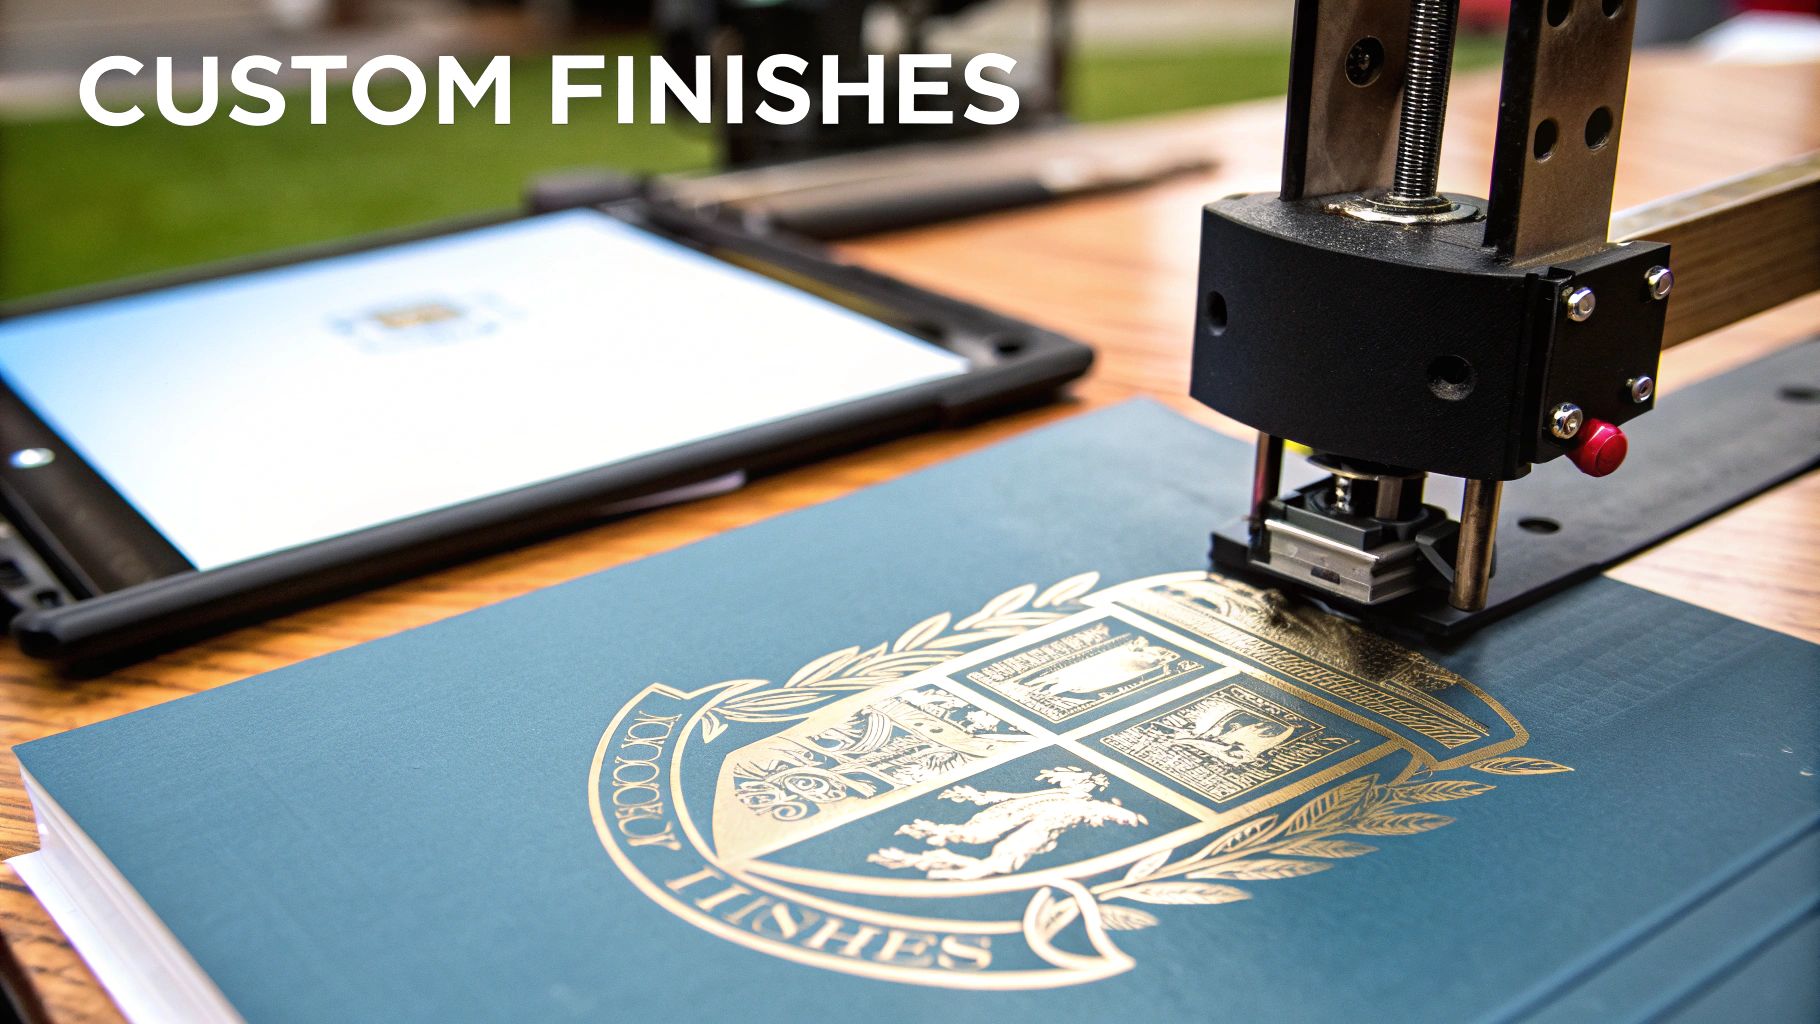
The final touches are what truly make a diploma cover special. This is where you move beyond a simple folder and create a real keepsake that reflects your institution's prestige and a graduate's incredible accomplishment. Finishes like foil stamping and embossing add a tangible sense of quality that you can see and feel.
Think of these details as powerful branding tools. A crisp school crest stamped in gleaming gold foil or a university seal subtly raised from the cover makes an immediate, lasting impression. Knowing how to use these techniques effectively is the secret to designing a cover that feels both professional and timeless.
Choosing Between Foil Stamping and Embossing
So, what's the difference? While both foil stamping and embossing add elegance and dimension, they get there in very different ways. Understanding the distinction will help you pick the right method—or even a combination of both—for your design.
Foil stamping is all about adding brilliant color and shine. The process uses a heated die to press a thin layer of metallic or colored foil onto the cover's surface.
- Best For: Creating high-contrast, eye-catching designs. If you want your logo and text to pop, the metallic sheen of gold, silver, or your specific school colors is the way to go.
- Real-World Example: Imagine a high school with deep blue vinyl covers. Stamping their mascot and graduation year in gold foil creates that vibrant, celebratory look they're after.
Embossing, on the other hand, creates a raised, 3D impression of your artwork. It uses two dies to press the design into the material, adding texture and a subtle, sophisticated feel without any color.
- Best For: Achieving a classic, understated, and professional look. This works beautifully for official seals and crests, especially on premium materials like padded leatherette.
- Real-World Example: A law school wants its official university seal on a traditional black leatherette cover. A "blind" emboss (meaning no foil) lends a timeless, tactile elegance that speaks to the institution's long-standing heritage.
Here's a pro tip: You can combine them. An embossed foil stamp first raises the design and then applies foil over it. This creates a stunning, multi-dimensional effect that’s impossible to miss. It’s a top-tier choice for doctoral programs or special commemorative diploma covers.
Preparing Your Artwork for Production
The quality of your finished cover is only as good as the artwork file you start with. To get that sharp, clean look everyone wants, a vector file isn't just a suggestion—it's an absolute must.
Unlike pixel-based images (like a JPEG or PNG), vector files (like .AI, .EPS, or a vector-based .PDF) are built with mathematical paths. This means they can be scaled to any size without losing a drop of clarity, which is critical for creating the precise metal dies needed for stamping and embossing.
To keep your project moving smoothly, run through this simple artwork checklist:
- Use Vector Format: Always submit your school crest, logos, and any text in a vector file.
- Convert Fonts to Outlines: Inside your design software, convert all text to "outlines" or "shapes." This locks in the font and prevents any errors when we open the file.
- Keep it Clean: Super intricate designs with tiny, thin lines don't always translate well, especially with embossing. Bold, clean lines will give you the best, most impressive result.
Selecting the Perfect Foil Colors
Foil stamping offers a fantastic palette to align with your school's brand. Classic gold and silver are always in style and convey a sense of tradition and achievement, but don't feel limited to them.
At Gradshop, we and other suppliers offer a huge range of foil colors to choose from:
- Metallic Foils: Gold, Silver, Copper, Rose Gold, Bronze.
- Pigment Foils: A whole spectrum of matte or gloss colors—red, blue, green, black—to perfectly match your school colors.
- Holographic Foils: For a modern, dynamic look that catches the light and changes color.
As you think about the visuals, some general design tips focusing on typography, color, and layout can spark great ideas, even though they're for a different medium. A well-chosen foil should complement the cover material, not fight it. For instance, silver foil on a black cover creates a sleek, contemporary vibe, while green foil on a white cover feels fresh and new. Don't hesitate to ask for a sample to see it in person! This same coordinated approach applies to all commencement gear; you can learn more about how we bring together custom stoles, diploma covers, and frames for your graduation in our other guide.
Getting the Sizing and Proofs Just Right
You’ve locked in the materials and finishes, and now it’s time to dial in the details. Getting the size of your diploma cover right isn't just important—it's everything. A cover that’s too big looks unprofessional, while one that’s too small simply won't work.
After sizing comes the proofing stage. This is your final chance to spot any issues before the full production run begins. A few minutes of careful review here can save you from a major headache (and a costly reorder) down the road.
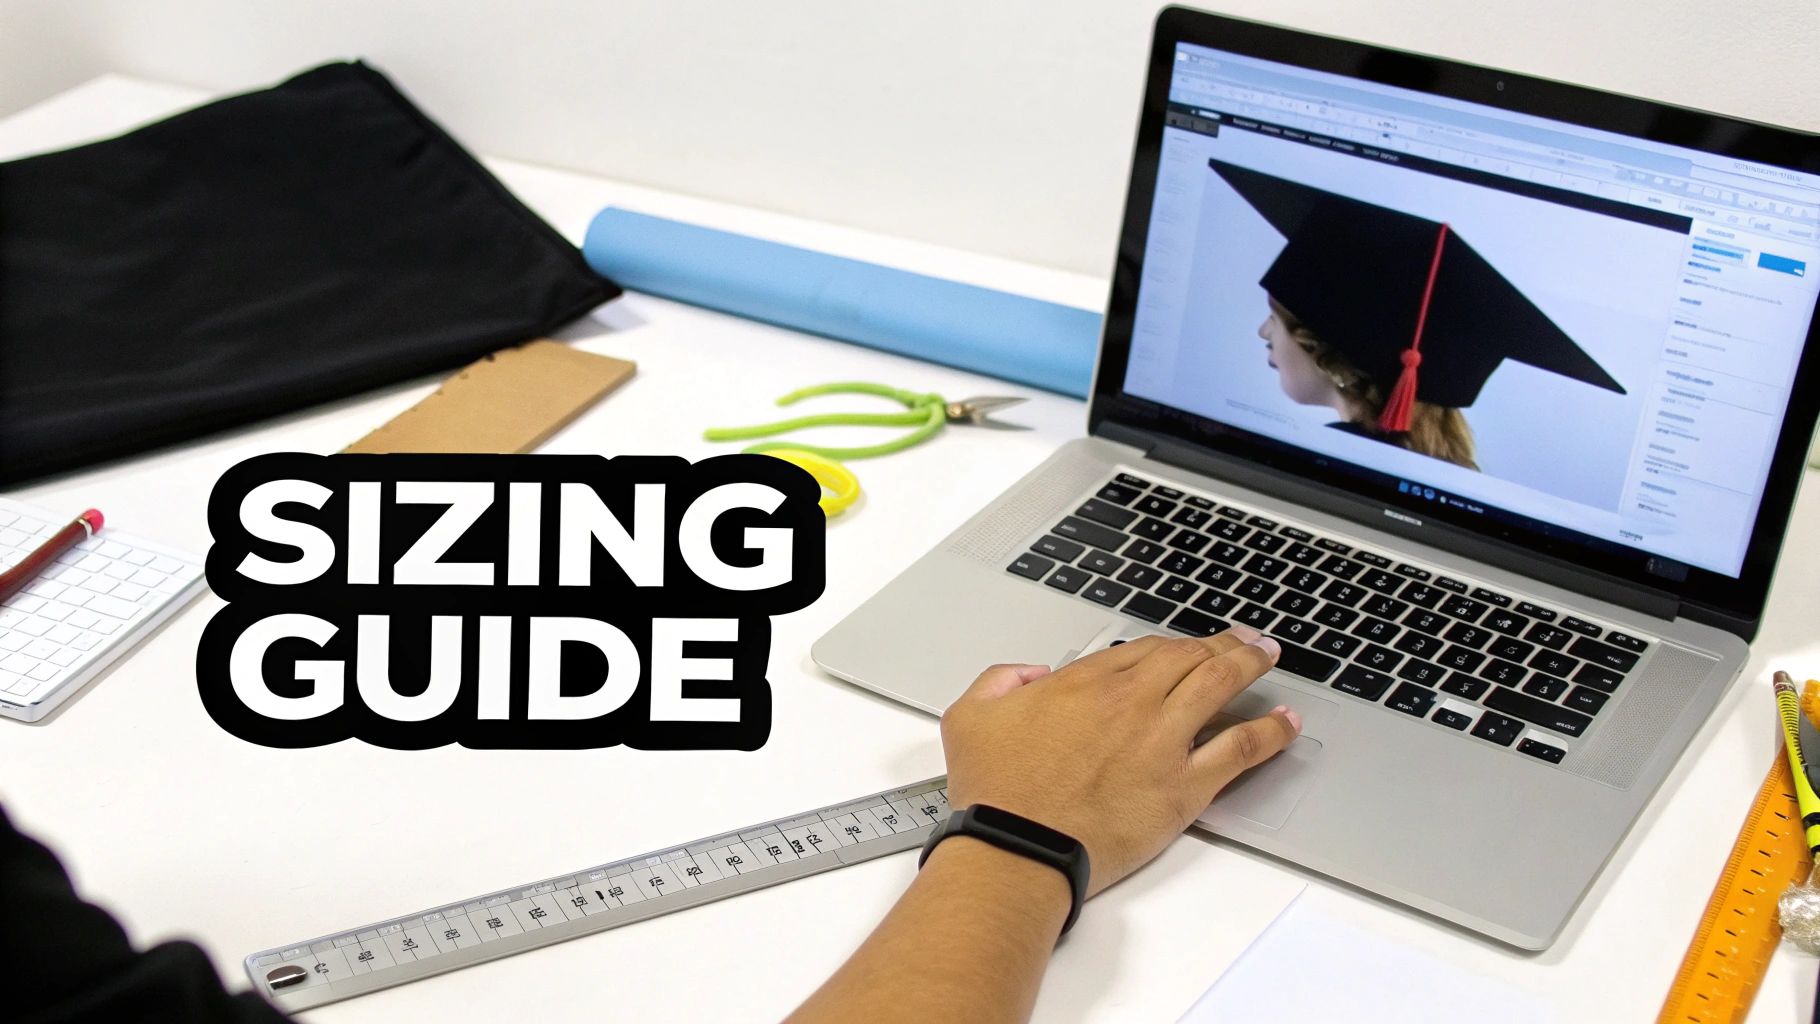
Nailing the Diploma Cover Size
Before placing any order, you absolutely must know the exact dimensions of the diploma itself. While there are some common sizes out there, they can vary widely between schools, and even between degree levels at the same institution.
The most common diploma sizes you’ll encounter are:
- 6" x 8": A popular choice for certificates, awards, and some high school diplomas.
- 8.5" x 11": This is standard letter size, making it a very common pick for undergraduate and graduate degrees.
- 11" x 14": A larger, more formal size often reserved for doctoral degrees or special honors.
Do not guess. The best way to guarantee a perfect fit is to grab a ruler and measure the actual diploma. This one simple step is the most effective way to prevent a sizing mistake.
Why the Digital Proof is So Important
Once your artwork and order details are submitted, you'll receive a digital proof. Think of this as the blueprint for your final product—a digital mockup showing exactly how your custom cover will look with your logo, text, and colors. It's your last line of defense against mistakes.
Treat this review seriously. It’s tempting to give it a quick glance and approve it, but a thorough inspection is essential. I've personally seen how a single, overlooked typo in a school's name can force a complete and very expensive reprint.
Here’s a quick checklist to run through when you get your proof:
- Check Every Word: Read all text for spelling errors. Pay close attention to the school name, any degree titles, and the graduation year.
- Verify Logo and Art: Is the school crest centered correctly? Is it the right size? Does it look crisp and clear?
- Confirm Colors: Do the foil and cover colors match what you ordered and align with your brand guidelines?
- Review the Layout: Check that all elements are properly aligned, spaced, and balanced on the cover.
For school administrators placing a bulk order for an entire graduating class, this step is mission-critical. Any delay in approving the proof can push back your production schedule, putting on-time delivery for graduation day at risk.
My best advice? Always get a second pair of eyes on the proof. After looking at a design multiple times, it’s easy to miss small errors. A colleague can often spot something you overlooked in seconds.
Establish a clear approval process. Have a designated point person for the final sign-off, but require them to consult with at least one other team member before giving the go-ahead. This simple step helps ensure every master's or doctoral graduate's hard-earned achievement is celebrated with a flawless cover.
Ultimately, taking your time with sizing and approvals guarantees the final product reflects your institution's high standards. A meticulous review ensures the diploma covers you receive are exactly what you envisioned, ready to be handed out with pride.
Planning Your Order Logistics and Timeline
A fantastic design is a great start, but getting those custom diploma covers into graduates' hands on time and within budget is where the real work begins. For school administrators and event coordinators, mastering the logistics of a bulk order is just as critical as picking the right foil color. Let’s walk through a strategic playbook for calculating quantities, understanding timelines, and navigating pricing to make the whole process smooth and stress-free.
Successful planning is all about looking ahead. If you can anticipate your needs, build in a cushion for the unexpected, and align your schedule with production realities, you'll avoid that last-minute panic and ensure every single graduate has their cover on the big day.
Determining the Right Order Quantity
Figuring out how many covers to order seems simple, but it’s always smart to plan for more than just your confirmed graduate list. Trust me, it's always better to have a few extra than to be a few short. A good rule of thumb is to order 5-10% more than your final number of graduates.
Why the buffer? This small overage is incredibly useful for a few common scenarios:
- Late Additions: There are always a few students who confirm their participation at the last minute.
- Oops Moments: Accidents happen. A cover might get damaged during shipping or handling, and having extras makes it a non-issue.
- Archival Copies: Your school's archives, the registrar's office, or specific departments might need a few copies for their records.
- Future Use: A small surplus can be a lifesaver for mid-year graduates or special award ceremonies.
Think of it as a small insurance policy. The minor cost upfront saves you the major headache and expense of placing a frantic rush order for a handful of covers later.
Understanding Production Lead Times
The number one question we get is, "When should I place my order?" The honest answer? It depends entirely on the time of year and how complex your design is. The window between March and June is the Super Bowl for graduation suppliers, and production timelines stretch out significantly.
Here’s a critical piece of advice for any event planner: order early. During the busy graduation season, standard production times can easily double. Placing your order well in advance locks in your production slot and shields you from the risk of delays.
Here’s a general guide to what you can expect:
- Off-Peak Season (July - February): Custom orders typically take about 4-6 weeks from final proof approval to delivery.
- Peak Season (March - June): Timelines can swell to 8-12 weeks, sometimes even longer for highly detailed orders.
Always, always confirm the current lead time with your supplier when you request a quote. That number should be the cornerstone of your entire planning calendar. Building in an extra week or two as a buffer is a pro move—it gives you breathing room for potential shipping hiccups or other unforeseen snags.
To help you visualize this, here's a sample timeline we recommend to schools to keep everything on track for a smooth, stress-free delivery.
Sample Diploma Cover Ordering Timeline
| Time Before Graduation | Action Item | Key Considerations |
|---|---|---|
| 6-8 Months | Initial Research & Budgeting | Gather quotes from different suppliers. Finalize your budget. |
| 5-6 Months | Finalize Design & Request Proofs | Submit your artwork and approve the digital or physical proof. |
| 4-5 Months | Place Your Order | This is the sweet spot, especially before peak season kicks in. |
| 2-3 Months | Confirm Production Status | Check in with your supplier for an update on production progress. |
| 1 Month | Confirm Shipping Details | Get tracking information and verify the delivery address and contact. |
| 1-2 Weeks | Receive & Inspect Order | Count the covers and check for any quality issues immediately upon arrival. |
Following a schedule like this helps ensure everything arrives with time to spare, eliminating one major source of stress as commencement approaches.
Navigating Pricing and Bulk Discounts
The price for custom diploma covers is shaped by a few key variables, and knowing what they are helps you manage your budget. The final cost per cover is mostly determined by the material, the complexity of your design, and—most importantly—your order quantity.
The main cost drivers are:
- Material Choice: Premium options like padded leatherette will naturally cost more than standard vinyl or textured paper.
- Customization: Adding multiple foil colors or combining a debossed seal with foil stamping will add to the cost.
- Quantity: This is where you can achieve the biggest savings. The more you order, the lower your price per cover.
Most suppliers use a tiered pricing model, where the cost per unit drops once you hit certain milestones (like 100+, 500+, or 1000+ units). For schools, this volume-based discount makes ordering in bulk extremely cost-effective. In fact, the global market for certificate covers is projected to hit $1.2 billion by 2027, a trend fueled by schools investing in quality presentation materials that both protect documents and elevate the ceremony—all while taking advantage of competitive wholesale pricing.
Coordinating with Other Graduation Essentials
Finally, don't forget that the diploma cover is just one piece of a much larger celebration. Its design should feel connected to the other key elements of your graduation. When everything looks like it belongs together, it elevates the entire ceremony and creates a polished, memorable experience for everyone.
For instance, if your school uses a specific shade of gold for its honor cords or custom stoles, think about using that same shade in the foil stamping on the cover. This kind of attention to detail creates a powerful, unified visual theme. If you're ordering a classic maroon imprinted graduation diploma cover, make sure it complements the colors of your caps, gowns, and tassels for a truly seamless presentation. A holistic approach ensures every piece of regalia works in harmony to celebrate your graduates' achievements with the style and dignity they deserve.
Answering Your Top Questions About Diploma Cover Design
When you're designing something as important as a diploma cover, a few questions always pop up. Let's face it, getting the details right matters. Here are the answers to the most common questions we hear from school administrators and graduation coordinators just like you.
Think of this as a practical cheat sheet to help you finalize your order with confidence. Getting these things right from the start saves a ton of time and makes sure the final product is something you'll be proud to hand out.
What’s the Minimum Order Quantity?
This is a big one, especially for smaller schools or specific departments. The honest answer is: it depends on what you need. The minimum order quantity (MOQ) really hinges on the complexity of your design.
If you’re choosing one of our standard, in-stock covers and just adding a simple one-color foil stamp of your school's name, the minimum is going to be pretty low and flexible. But if you're envisioning a completely custom cover with a unique material, a non-standard size, or intricate, multi-color artwork, the setup is more involved. That kind of custom work requires a larger initial order to be practical.
- Basic Customization: Expect a more flexible, lower minimum.
- Complex, From-Scratch Designs: These typically require a higher minimum order.
The best first step is to check the product page for the specific diploma cover you have your eye on. Or, even better, just give our team a call to chat about your project.
What’s the Best File Format for My School’s Logo?
For that sharp, professional look you get with foil stamping or embossing, the artwork file you send us is everything. The absolute gold standard is a vector file.
Why vector? Vector files (look for extensions like .AI, .EPS, or a vector-based .PDF) are made of lines and curves, not pixels. This means we can scale your crest or logo up or down to any size without it getting blurry or pixelated. A clean vector file allows us to create a perfect metal die, which is what gives you that flawless, crisp impression on the final cover.
Can I See a Sample Before Placing a Big Order?
Yes, and we highly recommend it. For large institutional orders, getting a sample in your hands is a critical step. There's just no substitute for being able to feel the material, see the true color in person, and judge the quality and sturdiness for yourself.
A physical sample offers complete peace of mind. It confirms that the cover meets your school’s standards before you commit to the full production run, eliminating any guesswork or unwelcome surprises down the line.
We can almost always send a sample of a similar style or material for free. If you need a pre-production sample with your exact logo on it, there's usually a small setup fee, but it’s often worth it. Knowing the covers will perfectly complement your students' caps and gowns makes all the difference.
At Gradshop, our goal is to help you create the perfect tribute to your graduates' hard work. From the first design idea to the final box arriving at your door, our team is here to make the process smooth and the result beautiful.
Explore our full range of graduation essentials to complete your ceremony's look. https://www.gradshop.com